The Business Central cloud migration tools for Dynamics SL include the SL Company Migration Configuration page. This page lets you set global settings for all companies selected to migrate, with the option to update at a company level if necessary. Learn more in Dynamics SL data migrated to Business Central online.
Complete this task after you set up cloud migration and before you replicate data.
Learn more in Dynamics SL migration to Business Central online: End-to-end overview.
Prerequisites
Run cloud migration setup for Dynamics SL migration.
Open the migration configuration
The SL Company Migration Configuration page opens automatically when you finish the Cloud Migration Setup assisted setup. To open it again, select Search (Alt+Q) in the upper-right corner, enter Cloud Migration Management, and choose the related link. Then select Configure SL Migration.
[Screenshot of the SL Company Migration Configuration page.]
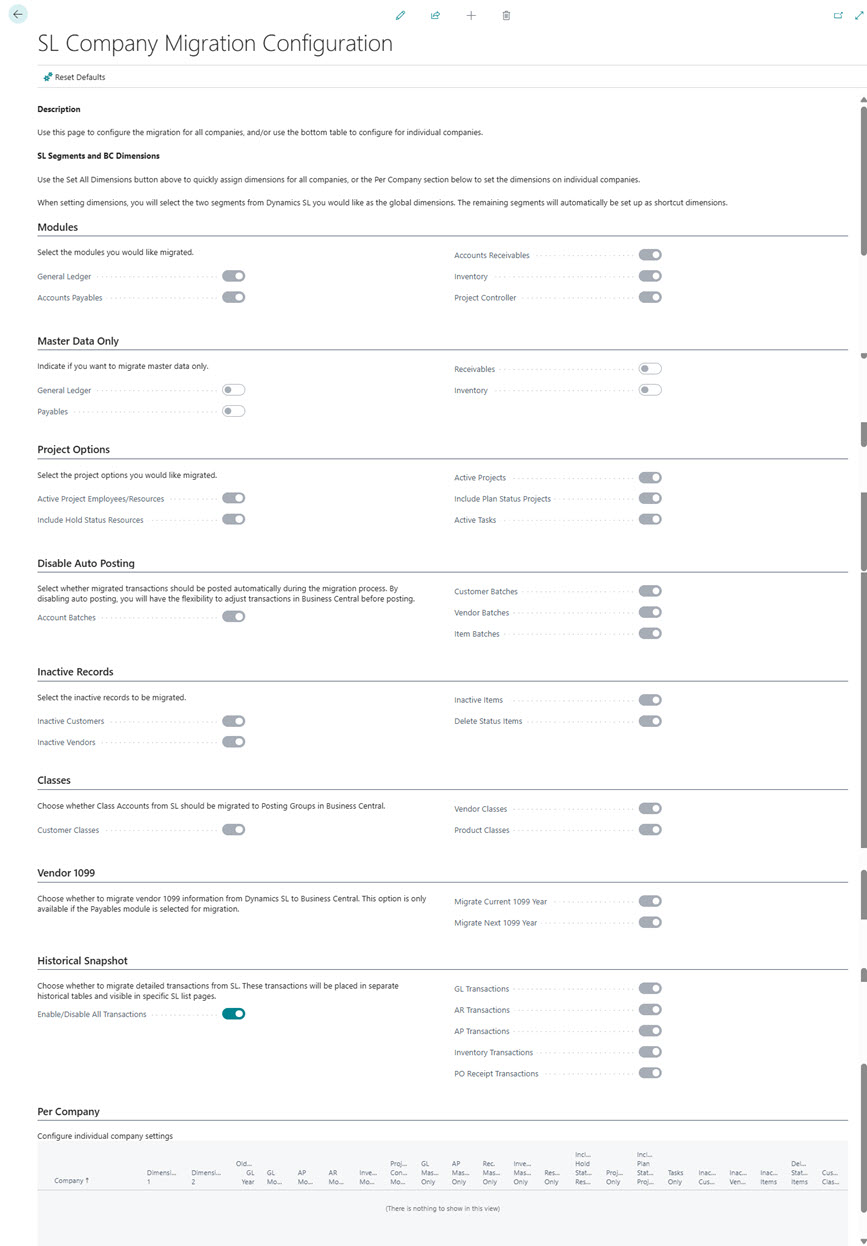
Once the SL Company Migration Configuration page is open, start configuring the data to migrate using the different sections of the page.
The page allows you to configure the migration globally for all selected companies (using the upper sections of the page) or individually for each company using the Per Company section.
In the Per Company section, review the Dimension 1 and Dimension 2 fields for each company and select the Dynamics SL subaccount segments to use as global dimensions.
As a best practice, specify how many years back to migrate data. Otherwise, the tool migrates all years. Regardless of whether you make changes, review the default settings before closing the page and continuing the migration process.
Configure migration globally
The steps in this section configure the data migration globally for all companies that you chose to migrate using the Cloud Migration Setup. If you're migrating more than one company, you can specify the configuration on a per company basis.
Set the dimensions.
To assign global dimensions for the companies you're migrating, select the Dimension 1 and Dimension 2 values in the Per Company section for each company. Set the dimensions manually for these companies. Dimension 1 and Dimension 2 are selected from the Dynamics SL subaccount segments you want to use as the global dimensions in Business Central. The remaining segments are automatically set up as shortcut dimensions. Learn more in Work with dimensions.
Modules: Choose the modules to migrate.
Use the Modules section to choose the specific modules to migrate data from to Business Central. By default, General Ledger, Accounts Payables, Accounts Receivables, and Inventory are selected. Open Purchase Orders, Open Sales Orders, Project Controller, and Cash Manager aren't selected. To exclude a module, turn off its switch. For example, to exclude payables, turn off the Accounts Payables switch.
Open purchase orders require General Ledger, Accounts Payables, and Inventory. Open sales orders require General Ledger, Accounts Receivables, and Inventory. Selecting either order option enables its required modules. Keep General Ledger enabled for customer, vendor, item, and project migration.
If you're migrating the General Ledger module, be sure to go to the Per Company section and specify the Oldest GL Year field. The year and all future years are migrated to Business Central. If you don't set the Oldest GL Year field, all years are migrated. Changing Oldest GL Year also sets Oldest Snapshot year to the same year, so review the snapshot cutoff afterward.
Master Data Only: Choose whether to migrate master data only for modules.
Use the Master Data Only section to specify those modules for which you only want to migrate master data. For example, if you only want to migrate vendors, turn on the Payables switch. Transactions aren't migrated in this case.
By default, both master data and transactional data for the selected modules are migrated. Master data represents the core information about entities that change infrequently, for example, information about a vendor. Transactional data captures specific activities or events for an entity, like open vendor documents.
Disable Auto Posting: Choose whether to disable auto posting for migrated transactions for the modules listed.
By default, the migration process automatically posts migrated transactions in batches based on the type. In the Disable Auto Posting section, specify transactions that you don't want to be posted automatically. To disable auto posting, turn on the switch.
Disabling auto posting is useful if you want to modify transactions before they're posted. For example, if you want to adjust general ledger transactions before they're posted, turn on the Account Batches switch.
Inactive Records: Choose the inactive records or discontinued items that you want to migrate.
In the Inactive Records section, specify the inactive records or discontinued items that you want to migrate. By default, no inactive records or discontinued items are migrated. For example, to migrate inactive customers, turn on the Inactive Customers switch. Use Delete Status Items for discontinued items.
Classes: Select which SL classes to migrate as posting groups in Business Central. You can migrate Vendor Classes to vendor posting groups, Customer Classes to customer posting groups, and Product Classes to inventory posting groups. Selecting a class option enables General Ledger and the corresponding module.
Project Options: If you enable Project Controller, review Active Project Employees/Resources, Include Hold Status Resources, Active Projects, Include Plan Status Projects, and Active Tasks. Enabling Project Controller turns on these options. Project migration includes master data, not project transactions.
Historical Snapshot: Choose the historical transactions that you want to migrate.
In the Historical Snapshot section, specify historical transactions to migrate to Business Central. The selected transactions are migrated to extension tables in Business Central. Users in the Business Central client can then view the data from specific Dynamics SL list pages.
To migrate historical transactions, use the following steps.
- To select all transaction types, turn on the Enable/Disable All Transactions switch. Otherwise, select types individually.
- Review the switches for GL Transactions, AR Transactions, AP Transactions, Inventory Transactions, and PO Receipt Transactions. AR Transactions also includes sales order history.
- Go to the Per Company section and set the Oldest Snapshot year field to the earliest year in Dynamics SL that you want to migrate.
Configure migration per company
In the Per Company section, set the data migration settings separately for each company when migrating more than one company. You can specify the same settings as globally, plus a couple more. Most initial settings are copied from the global settings. Review Include Hold Status Resources and Include Plan Status Projects for each company because these two options aren't copied when company settings are created. Later changes to global settings update company settings, so make company-specific changes last.
Specify how far back in time to migrate general ledger (GL) account summary data and historical snapshots using the following fields:
Oldest GL Year: Select the year from which you want to migrate GL account summary transactions. If the Oldest GL Year field isn't set, all years are migrated. Account summary transactions are generated for open and history years set up in Dynamics SL and posted unless you disable auto posting. The summary amounts are created based on the fiscal periods set up in Dynamics SL. For example, if 2019, 2020, 2021, and 2022 are historical years in Dynamics SL, but you only want to migrate data from 2021 and later, set the Oldest GL Year to 2021. As a result, summary transactions for 2019 and 2020 aren't migrated to Business Central.
Oldest Snapshot year: Select the year from which you want to migrate history snapshots. If the Oldest Snapshot year field isn't set, history snapshots from all years are migrated.